How to Read a Text Voltage Meter 10729w
In this project, we are going to make an Air-conditioning Voltage Measuring Device using Arduino, which volition measure the voltage of Alternating Current Supply at our dwelling house. We are going to print that voltage on serial monitor of Arduino IDE too as show on the multimeter.
Making a Digital Voltmeter is a lot piece of cake than making an analog one considering in case of analog voltmeter you must take skilful noesis of physical parameters like torque, friction losses etc. whereas in example of digital voltmeter you can just use a LCD or LED matrix or even your laptop (as in this case) to print the voltage values for you lot. Here are some Digital Voltmeter Projects:
- Simple Digital Voltmeter Excursion with PCB using ICL7107
- LM3914 Voltmeter Circuit
- 0-25V Digital Voltmeter using AVR Microcontroller
Required Components:
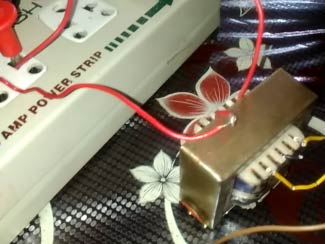
- One 12-0-12 transformer
- 1N4007 diode
- 1uf capacitor
- Resistors 10k; 4.7k.
- Zener diode(5v)
- Arduino UNO
- Connecting wires
Arduino Voltmeter Circuit Diagram:

Circuit Diagram for this Arduino Voltmeter is shown above.
Connections:
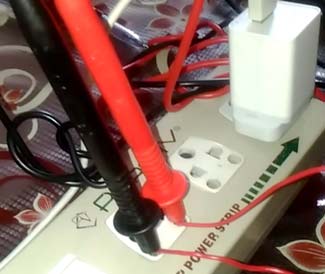
- Connect high voltage side(220V) of transformer to the mains supply and low voltage(12v) to the voltage divider excursion.
- Connect 10k resistor in series with 4.7k resistor but make sure to take voltage as input beyond four.7k resistor.
- Connect diode equally shown.
- Connect capacitor and zener diode beyond 4.7k
- Connect a wire from northward-terminal of diode to the analog pivot A0 of Arduino.
** Note: Exercise connect ground pin of Arduino to the point equally shown in the figure or excursion will not work.
Demand of voltage divider circuit?
Every bit we are using 220/12 five transformer, we get 12 v on 50.v side. Since this voltage is not suitable equally input for Arduino we demand a voltage divider circuit which tin requite suitable voltage value equally input to Arduino
.
Why diode and capacitor is continued?
Since Arduino do non take negative voltage values as input, we first need to remove negative cycle of step downwards AC so that simply positive voltage value is taken past Arduino. Hence diode is continued to rectify the step down voltage. Check our Half wave rectifier and Full wave Rectifier excursion to larn more about rectification.
This rectified voltage is not smooth equally it contains large ripples which cannot give us any exact analog value. Hence capacitor is connected to smoothen out the a.c bespeak.
Purpose of zener diode?
Arduino can get damage if voltage greater than 5v is fed to it. Hence a 5v zener diode is connected to ensure prophylactic of Arduino which breakdowns in case this voltage exceeded 5v.
Working of Arduino based Ac Voltmeter:
one. Footstep down voltage is obtained on l.v side of transformer which is suitable to utilize across normal ability rating resistors.
two. And then we go suitable voltage value beyond 4.7k resistor
Maximum voltage that can be measured is found by simulating this excursion on proteus (explained in simulation section).
3. Arduino takes this voltage as input from pin A0 in grade of analog values between 0 to 1023. 0 being 0 volt and 1023 being 5v.
iv. Arduino then converts this analog value into respective mains a.c. voltage by a formula. (Explained in code section).
Simulation:

Exact circuit is made in proteus and and so fake. To find maximum voltage that this excursion tin measure out hit and trial method is used.
On making alternator's superlative voltage 440 (311 r.grand.southward), voltage on pin A0 was found to exist 5 volts i.east. maximum. Hence this circuit can mensurate maximum 311 r.m.s voltage.
Simulation is performed for diverse voltages between 220 r.m.s to 440v.

Code Caption:
Complete ArduinoVoltmeter Code is given at the end of this project and it is well explained through the comments. Here nosotros are explaining few part of information technology.
thousand is the input analog value received on pivot A0 i.east.,
thou= pinMode (A0,INPUT) ; // set pin a0 as input pin
To assign variable north to this formula northward=(m* . 304177), commencement some sort of calculations is performed by using the data obtained in simulation section:
Every bit seen in simulation photo, 5v or 1023 analog value is obtained at pin A0 when input a.c voltage is 311volts. Hence:
1023 analog value corresponds to 311 volt mains supply
So any random analog value corresponds to (311/1023)*m where grand is obtained analog value.
Hence we go far at this formula:
n=(311/1023)*m volts or n=(1000*.304177)
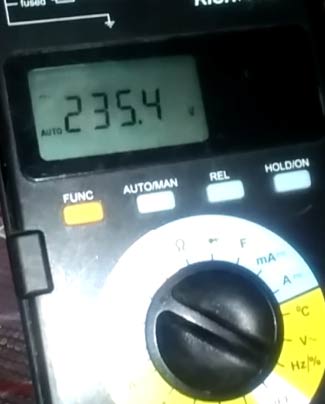
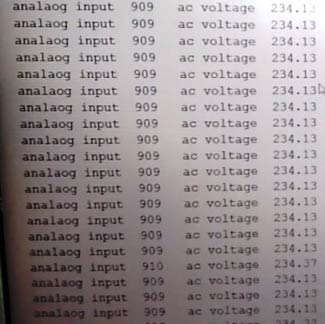
At present this voltage value is printed on the series monitor past using serial commands as explained below. And also shown on the multimeter as demonstrated in the Video beneath.
Values printed on the screen are:
Analog input value as specified in the code:
Serial.print(" analog input ") ; // this gives proper noun which is "analog input" to the printed analog value Serial.impress(thou);// this simply prints the input analog value Required a.c voltage as specified in the code:
Serial.impress(" air conditioning voltage ") ; // this gives name "air conditioning voltage" to the printed analog value Serial.print(n) ; // this simply prints the ac voltage value Code
int thousand;// initialise variable 1000
float n;//initialise variable due north
void setup()
{
pinMode(A0,INPUT); // set pin a0 equally input pivot
Serial.begin(9600);// begin serial communication between arduino and pc
}
void loop()
{
m=analogRead(A0);// read analog values from pin A0 across capacitor
n=(k* .304177);// converts analog value(x) into input ac supply value using this formula ( explained in woeking department)
Serial.print(" analaog input " ) ; // specify name to the corresponding value to be printed
Serial.impress(thou) ; // print input analog value on series monitor
Serial.impress(" ac voltage ") ; // specify proper noun to the corresponding value to be printed
Serial.print(northward) ; // prints the ac value on Series monitor
Serial.println();
}
Source: https://circuitdigest.com/microcontroller-projects/arduino-ac-voltmeter
0 Response to "How to Read a Text Voltage Meter 10729w"
Post a Comment